
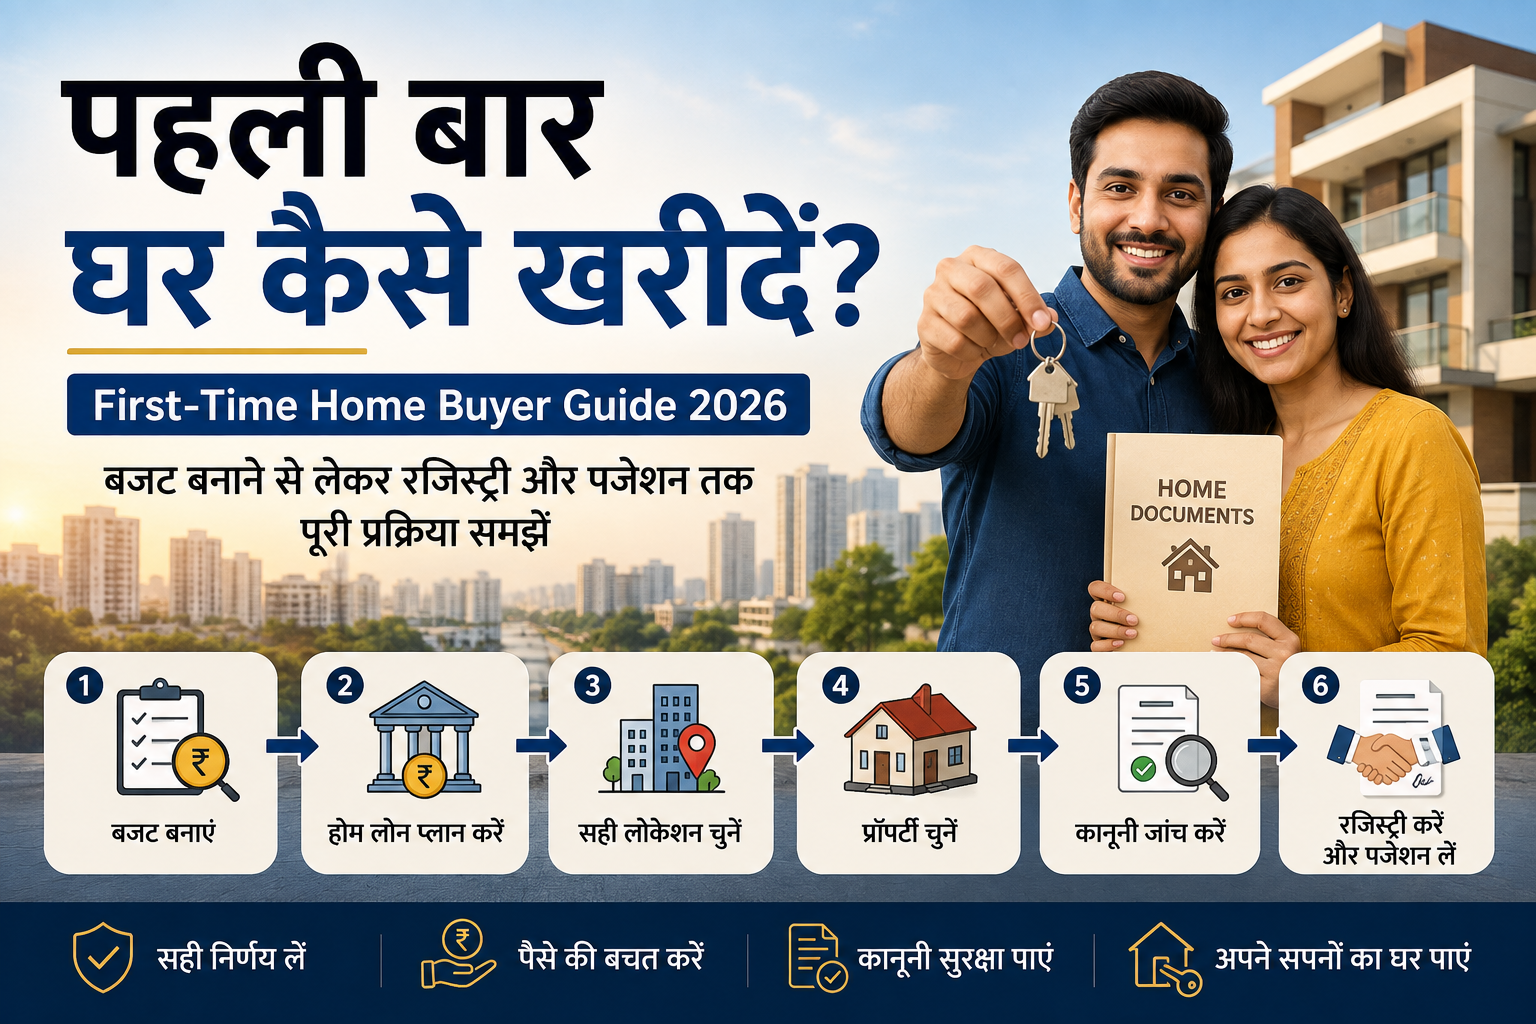
अगर आप पहली बार घर कैसे खरीदें यह समझने की कोशिश कर रहे हैं, तो शुरुआत property search से नहीं बल्कि अपने budget, down payment और home loan eligibility को समझने से करें। पहली बार घर खरीदते समय सिर्फ property की कीमत देखना काफी नहीं है—registration charges, stamp duty, loan costs, maintenance, brokerage (जहाँ लागू हो), interiors और emergency savings को भी budget में शामिल करना जरूरी है।
इसके बाद सही location और property type चुनें, property के legal documents verify करें, applicable होने पर RERA details check करें, site visit करें और उसके बाद ही token amount या booking amount देने का फैसला करें। Builder floor, apartment, resale property और under-construction property—हर option में due diligence अलग हो सकती है।
इस 2026 First-Time Home Buyer Guide में हम घर खरीदने की पूरी प्रक्रिया step-by-step समझेंगे—budget बनाने से लेकर property search, home loan, legal verification, price negotiation, registration और possession तक—ताकि पहली बार buyer केवल property पसंद करके नहीं, बल्कि पूरी जानकारी के साथ फैसला कर सके।
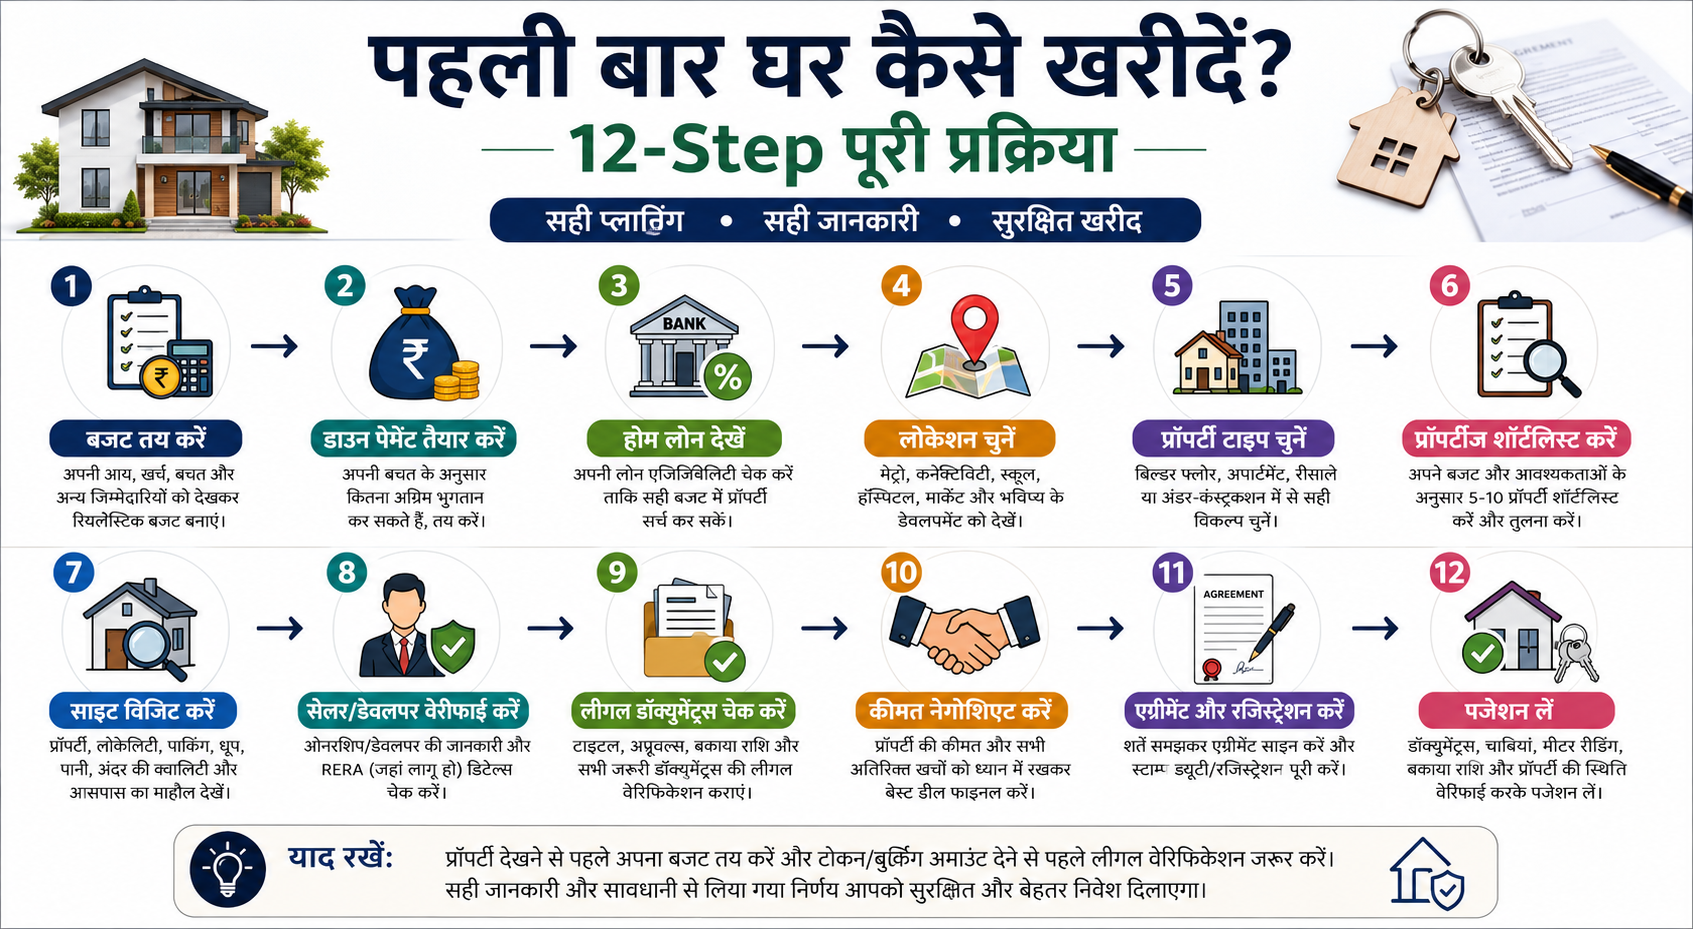
पहली बार घर कैसे खरीदें? 12 Steps में पूरी प्रक्रिया
| Step | क्या करना है | क्यों जरूरी है |
|---|---|---|
| 1. Budget तय करें | Income, savings और monthly expenses देखकर realistic property budget बनाएं | Over-budget property खरीदने से बचेंगे |
| 2. Down Payment तैयार करें | तय करें कि अपनी savings से कितना upfront payment कर सकते हैं | Loan requirement और EMI समझने में मदद मिलेगी |
| 3. Home Loan Eligibility Check करें | Income, credit profile और existing EMIs के आधार पर eligibility समझें | Property search realistic budget में रहेगी |
| 4. Location चुनें | Connectivity, Metro, workplace, school, hospital और future development देखें | Location property value और lifestyle दोनों को प्रभावित करती है |
| 5. Property Type चुनें | Builder Floor, Apartment, Resale या Under-Construction compare करें | हर property type के benefits और risks अलग हैं |
| 6. Properties Shortlist करें | Budget और requirements के अनुसार 5–10 relevant properties compare करें | Emotional decision की जगह comparison कर पाएंगे |
| 7. Site Visit करें | Construction, locality, parking, sunlight, water, access और surroundings देखें | Online photos पूरी स्थिति नहीं बताते |
| 8. Seller/Developer Verify करें | Ownership/developer details और applicable होने पर RERA information check करें | Fraud और problematic transactions का risk कम होता है |
| 9. Legal Documents Check करें | Title, sale deed, approvals, dues और applicable property documents verify कराएं | Legal ownership और compliance समझने के लिए |
| 10. Final Price Negotiate करें | Property price के साथ additional costs भी calculate करें | वास्तविक acquisition cost समझ आएगी |
| 11. Agreement & Registration करें | Terms समझकर agreement execute करें और applicable stamp duty/registration complete करें | Ownership transaction legally document होता है |
| 12. Possession लें | Documents, keys, meter readings, dues और property condition verify करें | Transaction properly close करने में मदद मिलती है |
Step 1: घर खरीदने से पहले अपना सही Budget कैसे तय करें?
पहली बार buyer की सबसे आम गलतियों में से एक है property का budget केवल “मुझे कितना home loan मिल सकता है?” के आधार पर तय करना। Bank जितना loan देने के लिए तैयार है और आप आराम से जितना loan चुका सकते हैं—दोनों अलग हो सकते हैं।
सबसे पहले अपनी monthly take-home income, existing EMIs, household expenses, emergency savings और future financial commitments लिखें। इसके बाद तय करें कि कितनी EMI ऐसी है जिसे आप income में temporary बदलाव आने पर भी comfortably manage कर सकें।
उदाहरण के लिए, अगर किसी property की कीमत ₹50 लाख है, तो buyer को सिर्फ ₹50 लाख की property price के बारे में नहीं सोचना चाहिए। वास्तविक cash requirement में down payment के साथ stamp duty, registration fee, loan-related expenses, brokerage जहाँ लागू हो, shifting/interiors और शुरुआती maintenance expenses भी शामिल हो सकते हैं.
| संभावित खर्च | उदाहरण |
|---|---|
| Property Price | ₹50,00,000 |
| Down Payment | Loan structure पर निर्भर |
| Stamp Duty / Transfer Duty | Applicable government rate के अनुसार |
| Registration Fee | Applicable government rate के अनुसार |
| Home Loan Charges | Bank/lender के अनुसार |
| Brokerage | जहाँ लागू हो |
| Interiors / Repairs | Property condition पर निर्भर |
| Moving & Initial Expenses | Buyer-specific |
| Emergency Reserve | अलग से रखना बेहतर |
इसलिए अगर आपका maximum available budget ₹50 लाख है, तो सीधे ₹50 लाख की property shortlist करना हमेशा सही approach नहीं होगा। Transaction और post-purchase costs के लिए financial buffer रखना पहली बार buyer के लिए विशेष रूप से महत्वपूर्ण है।
Step 2: पहली बार घर खरीदने के लिए Down Payment कितना होना चाहिए?
Home loan लेने का मतलब यह नहीं है कि bank property की पूरी कीमत finance करेगा। Buyer को property price का एक हिस्सा अपनी तरफ से down payment के रूप में arrange करना पड़ता है।
कितनी down payment चाहिए, यह property value, loan amount, lender और borrower profile पर निर्भर करता है। RBI के housing-finance framework में permitted Loan-to-Value (LTV) ratio loan size के अनुसार अलग हो सकता है। इसका मतलब है कि buyer को transaction का कुछ हिस्सा अपने funds से देना पड़ सकता है।
उदाहरण के लिए, अगर lender किसी transaction में property value का 80% finance करता है, तो बाकी 20% buyer को arrange करना होगा. लेकिन इसे universal 80:20 rule न समझें—actual sanction lender और case के अनुसार अलग हो सकता है.
Down Payment के अलावा भी Cash क्यों चाहिए?
पहली बार buyer को एक महत्वपूर्ण बात समझनी चाहिए: down payment आपकी पूरी upfront cash requirement नहीं है।
Stamp duty, registration और documentation जैसे transaction costs सामान्यतः property value के साथ automatically home loan में finance नहीं माने जाने चाहिए। RBI भी banks के LTV calculation में stamp duty, registration और other documentation charges को सामान्यतः financed property cost में शामिल न करने की बात करता है।
| पैसा कहाँ लगेगा? | Home Loan पर पूरी तरह निर्भर रहें? |
|---|---|
| Property का financed portion | हाँ, sanction के अनुसार |
| Down Payment | नहीं — buyer funds |
| Stamp Duty | अलग budget रखें |
| Registration | अलग budget रखें |
| Brokerage | जहाँ applicable हो |
| Interiors / Repairs | अलग budget |
| Moving Expenses | अलग budget |
| Emergency Fund | अलग रखना बेहतर |
Step 3: Home Loan Eligibility कैसे Check करें?
Property shortlist करने से पहले अपनी home loan eligibility समझना बेहतर है। इससे आप ऐसी properties पर समय खर्च करने से बच सकते हैं जो आपके realistic financing budget से बाहर हैं.
RBI की consumer guidance के अनुसार banks repayment capacity तय करते समय disposable/surplus income के साथ monthly income, expenses, assets, liabilities, income stability और अन्य financial commitments जैसे factors देख सकते हैं।
Bank किन चीजों को देख सकता है?
Co-applicant income, जहाँ applicable हो
Monthly income
Existing EMIs और loans
Monthly financial obligations
Credit history/profile
Employment या business stability
Age और proposed loan tenure
Available down payment
Property being financed
दो लोगों की salary समान होने के बावजूद उनकी home loan eligibility अलग हो सकती है। उदाहरण के लिए, एक buyer के पास existing car loan और personal loan हो सकता है, जबकि दूसरे buyer के पास कोई existing EMI नहीं हो। इसलिए केवल salary देखकर maximum property budget तय करना सही approach नहीं है.
Pre-Approval और Final Loan Approval में फर्क समझें
किसी lender से indicative eligibility या pre-approval मिलना useful हो सकता है, लेकिन इसे final property approval न समझें। Final sanction/disbursement में lender borrower के साथ-साथ specific property और उसके documents की भी जांच कर सकता है.
इसलिए सिर्फ यह सोचकर token amount न दें कि “मेरा home loan pre-approved है.” पहले यह समझें कि selected property lender की legal और technical requirements भी पूरी करती है या नहीं.
Step 4: पहली बार घर खरीदते समय सही Location कैसे चुनें?
पहली बार घर खरीदते समय सिर्फ अच्छी property ढूंढना काफी नहीं है—सही location चुनना उतना ही जरूरी है। आप घर के interiors बाद में बदल सकते हैं, लेकिन property की location नहीं बदल सकते।
Delhi में दो properties की कीमत समान होने के बावजूद उनका long-term value, rental demand और रहने का experience काफी अलग हो सकता है। इसलिए locality चुनते समय केवल “South Delhi”, “Dwarka” या “Rohini” जैसे बड़े area names देखने के बजाय exact block, sector, road और आसपास की infrastructure को evaluate करें।
| क्या Check करें | क्या देखें |
|---|---|
| Metro Connectivity | Nearest Metro station और actual walking/driving distance |
| Workplace Commute | Peak-hour travel time |
| Schools | बच्चों के लिए practical daily distance |
| Hospitals | Emergency और regular healthcare access |
| Markets | Grocery, pharmacy और daily necessities |
| Road Connectivity | Main road access और traffic congestion |
| Parking | आपके और visitors के लिए actual parking situation |
| Water & Sewerage | Supply arrangement और existing infrastructure |
| Neighbourhood | Noise, commercial activity, safety और density |
| Future Development | Proposed roads, Metro/infrastructure और land-use changes |
Metro के पास Property हमेशा बेहतर होती है?
Metro connectivity Delhi में एक बड़ा advantage हो सकती है, लेकिन “Metro के जितना पास, property उतनी बेहतर” हमेशा सही formula नहीं है।
बहुत पास होने पर traffic, commercial activity, pedestrian movement और noise भी बढ़ सकते हैं। वहीं बहुत दूर property होने पर daily commute inconvenient हो सकता है।
इसलिए Google Maps पर सिर्फ distance देखने के बजाय एक बार property से Metro station तक actual route खुद travel करके देखें।
DDA’s Master Plan framework also recognises the importance of pedestrian and public-transport access around Metro stations, including planning considerations within roughly 500 metres of stations.
Delhi में Water और Sewerage जरूर Check करें
पहली बार buyer अक्सर kitchen, balcony और bedroom देखकर property decide कर लेता है, लेकिन water supply और sewerage arrangement पूछना भूल जाता है।
Seller या existing residents से पूछें:
- पानी का primary source क्या है?
- Delhi Jal Board connection है?
- पानी कितने समय आता है?
- Summer में shortage होती है?
- Overhead/underground storage कितनी है?
- Tanker dependency है?
- Sewer connection की स्थिति क्या है?
- कोई pending water/sewer dues हैं?
Delhi Jal Board के अनुसार water connection की availability technical/legal feasibility, existing distribution infrastructure और applicable property conditions पर निर्भर करती है; group-housing developments में bulk-connection arrangements भी हो सकते हैं.
Property को अलग-अलग समय पर Visit करें
Property को सिर्फ Sunday afternoon में देखकर final मत करें। अगर seriously interested हैं तो locality को कम से कम दो अलग-अलग समय पर देखने की कोशिश करें।
Morning: water, school traffic और daily activity
Peak office hours: traffic और commute
Evening: parking और market congestion
Night: noise, street lighting और neighbourhood activity
इससे आपको वह information मिल सकती है जो property photos या 20-minute broker visit में दिखाई नहीं देती।
Google Maps पर ये 5 Searches करें
Before buying, search:
Property → OfficeProperty → Nearest MetroProperty → HospitalProperty → SchoolProperty → Main Market
Then check travel time during the hours when you would actually use those routes.
Delhi Buyer Tip
₹5–10 लाख interiors पर बाद में खर्च किए जा सकते हैं, लेकिन खराब location को renovate नहीं किया जा सकता। पहली बार buyer को घर की finishing से पहले micro-location, connectivity और basic infrastructure evaluate करनी चाहिए।
Step 5: Builder Floor, Apartment, Resale या Under-Construction — क्या खरीदें?
अगर आप पहली बार घर कैसे खरीदें यह समझ रहे हैं, तो budget और location तय करने के बाद अगला बड़ा फैसला है—किस प्रकार की property खरीदें?
पहली बार buyer के लिए Builder Floor, Apartment, Resale Property और Under-Construction Property चारों के अपने फायदे और risks हैं। केवल नई property देखकर आकर्षित होने या कम कीमत देखकर decision लेने के बजाय possession timeline, legal documentation, maintenance, construction quality और total buying cost को साथ में compare करें।
पहली बार Buyer के लिए Quick Comparison
| Property Type | मुख्य फायदा | क्या Check करें | किसके लिए बेहतर हो सकती है |
|---|---|---|---|
| Builder Floor | Privacy, fewer neighbours और independent living | Title, sanctioned plan, construction quality, parking और common-area rights | Privacy और independence चाहने वाले buyers |
| Apartment | Security, amenities और managed maintenance | Society condition, maintenance charges, parking, approvals और common facilities | Families और managed living चाहने वाले buyers |
| Resale Property | Actual property और locality देखकर decision ले सकते हैं | Ownership chain, dues, property condition, previous documents और existing loan/charge | Established locality या ready possession चाहने वाले buyers |
| Under-Construction | New construction और payment schedule का विकल्प मिल सकता है | RERA applicability/registration, developer record, approvals, agreement और possession timeline | Buyers जो possession के लिए wait कर सकते हैं |
Builder Floor कब Consider करें?
अगर आपकी priority privacy, कम neighbours, larger independent space और established residential colony है, तो builder floor consider किया जा सकता है।
लेकिन पहली बार buyer को सिर्फ floor का interior देखकर decision नहीं लेना चाहिए। Parking rights, terrace/common areas, lift, sanctioned construction, ownership documents और building condition को भी verify करना जरूरी है।
Apartment कब बेहतर हो सकता है?
अगर आप security, lift, power backup, shared amenities, maintenance management और community living को priority देते हैं, तो apartment practical option हो सकता है।
लेकिन society की reputation के साथ monthly maintenance, building age, parking, water supply, occupancy, common-area condition और future major repair expenses भी देखें।
Resale Property कब Consider करें?
Resale property का एक बड़ा फायदा यह है कि buyer अक्सर actual house, building और surrounding neighbourhood को transaction से पहले देख सकता है। Established locality में rental demand, traffic, parking और daily infrastructure को समझना भी comparatively आसान हो सकता है।
दूसरी तरफ, ownership history, outstanding dues, existing mortgage/charge, alterations और property condition की proper verification बहुत महत्वपूर्ण है।
Under-Construction Property कब Consider करें?
Under-construction property में buyer को new construction और phased payment schedule जैसे फायदे मिल सकते हैं, लेकिन possession future में मिलता है। इसलिए developer के promises पर ही निर्भर न रहें।
जहाँ RERA लागू होता है, project की registration details, declared completion timeline और available project disclosures को संबंधित RERA authority पर independently verify करें।
पहली बार Buyer के लिए कौन सा बेहतर है?
पहली बार buyer के लिए कोई एक property type हमेशा सबसे बेहतर नहीं होती। अगर immediate possession और established locality महत्वपूर्ण है, तो ready/resale options attractive हो सकते हैं। अगर managed amenities चाहिए तो apartment, जबकि privacy और independent living priority हो तो builder floor relevant हो सकता है।
Final decision property type के नाम पर नहीं, बल्कि individual property की legal clarity, location, condition, total cost और आपकी financial capacity पर होना चाहिए।
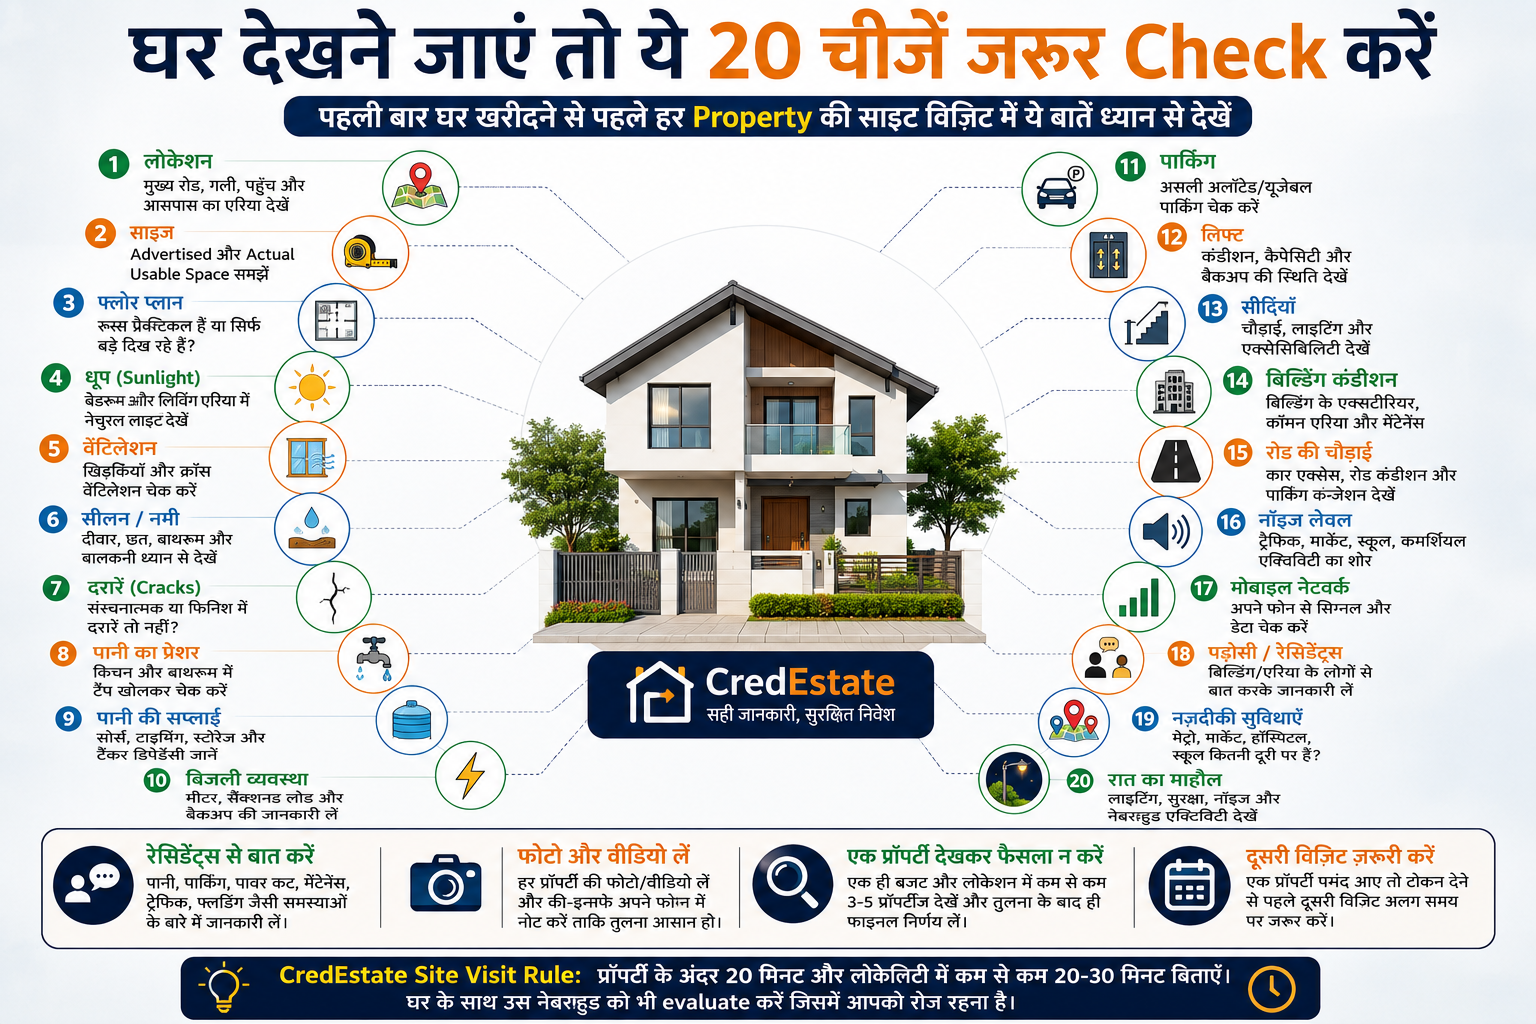
Step 6: Property Shortlist और Site Visit करते समय क्या Check करें?
Online photos, videos और broker descriptions property shortlist करने में मदद कर सकते हैं, लेकिन पहली बार घर खरीदने से पहले physical site visit करना बहुत जरूरी है। अच्छी photography कई practical problems नहीं दिखाती—जैसे parking difficulty, कम sunlight, seepage, traffic noise, खराब approach road या आसपास की construction.
कोशिश करें कि final decision से पहले property को ध्यान से inspect करें और केवल interiors देखकर प्रभावित न हों। Building, neighbourhood और daily usability भी property का हिस्सा हैं।
No. | क्या Check करें | क्या देखें |
|---|---|---|
| 1 | Actual Location | Main road, internal lane, accessibility |
| 2 | Property Size | Advertised और actual usable space को समझें |
| 3 | Floor Plan | Rooms practical हैं या सिर्फ बड़े दिख रहे हैं? |
| 4 | Sunlight | Bedrooms/living areas में natural light |
| 5 | Ventilation | Windows और cross ventilation |
| 6 | Seepage/Dampness | Walls, ceilings, bathrooms, balconies |
| 7 | Cracks | Visible structural/finish cracks |
| 8 | Water Pressure | Kitchen और bathrooms में check करें |
| 9 | Water Supply | Source, timings, storage और tanker dependency |
| 10 | Electricity | Meter, sanctioned load और backup arrangement |
| 11 | Parking | Actual allocated/usable parking |
| 12 | Lift | Condition, capacity और backup |
| 13 | Staircase | Width, lighting और accessibility |
| 14 | Building Condition | Exterior, common areas और maintenance |
| 15 | Road Width | Car access और parking congestion |
| 16 | Noise | Traffic, market, school, commercial activity |
| 17 | Mobile Network | अपने phone से signal/data check करें |
| 18 | Neighbours | Building/locality के residents से बात करें |
| 19 | Nearby Facilities | Metro, market, hospital, school |
| 20 | Night Environment | Lighting, parking, noise और neighbourhood activity |
सिर्फ Broker से नहीं—Residents से भी बात करें
Property देखने के दौरान आसपास रहने वाले एक-दो residents से बात करना काफी useful हो सकता है। उनसे पूछें कि water supply, parking, power cuts, maintenance, traffic, flooding/waterlogging या neighbourhood-related problems regularly आती हैं या नहीं।
Seller और broker naturally property की positive side दिखाएंगे; existing residents आपको daily living experience का अलग perspective दे सकते हैं।
Property Visit के दौरान Photos और Videos बनाएं
अगर आप एक दिन में कई properties देख रहे हैं, तो बाद में details mix हो सकती हैं। Permission लेकर प्रत्येक shortlisted property के rooms, bathrooms, kitchen, balcony, parking, building exterior और street की photos/videos रखें।
साथ में property का asking price, floor, approximate size, parking और key observations अपने phone में note करें।
एक Property देखकर Decision मत लें
कोशिश करें कि एक ही budget और locality में कम से कम 3–5 comparable properties देखें। इससे आपको समझ आएगा कि asking price reasonable है या सिर्फ seller की expectation है।
उदाहरण के लिए, अगर एक ही locality में similar size की तीन properties ₹65 लाख, ₹72 लाख और ₹85 लाख में available हैं, तो सिर्फ सबसे सस्ती property चुनना सही नहीं होगा। आपको condition, legal status, floor, parking, age और exact micro-location का difference भी समझना होगा।
Second Visit क्यों जरूरी हो सकती है?
अगर कोई property seriously पसंद आती है, तो token देने से पहले second visit करना useful हो सकता है। पहली visit में buyer अक्सर interiors और overall impression पर ज्यादा ध्यान देता है; दूसरी visit में practical issues ज्यादा आसानी से दिखाई देते हैं।
दूसरी visit अलग समय पर करें—अगर पहली visit afternoon में हुई थी तो अगली visit evening या peak traffic hours में करें।
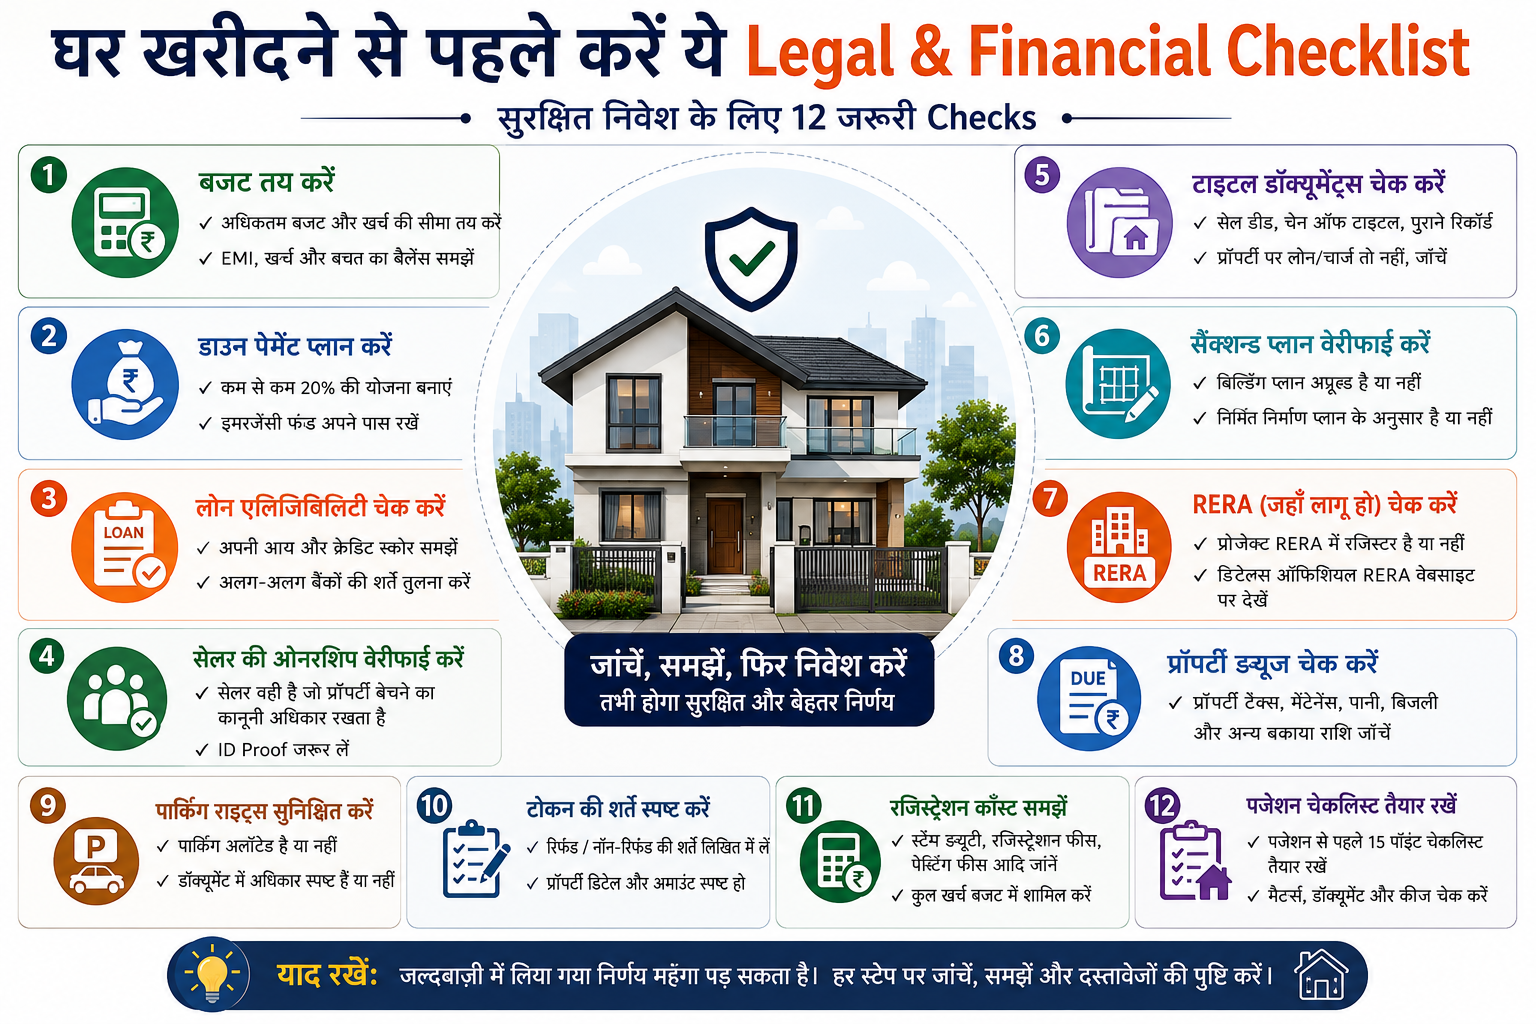
Step 7: Seller, Builder और Property की Legal Verification कैसे करें?
अगर आप पहली बार घर कैसे खरीदें यह सीख रहे हैं, तो सबसे महत्वपूर्ण rule यह है—property पसंद आने और legal property होने में फर्क है।
Location, interiors और price पसंद आने के बाद भी token या substantial payment करने से पहले property की ownership, seller identity और applicable approvals/documents की independent verification कराएं। अलग-अलग property types—builder floor, apartment, resale और under-construction—में required documents अलग हो सकते हैं।
1. Seller की Identity और Ownership Verify करें
सबसे पहले यह verify करें कि property बेचने वाला व्यक्ति वही है जिसके पास property transfer करने का कानूनी अधिकार है। Seller का नाम और property details उपलब्ध title/ownership documents से match करें।
अगर property multiple owners के नाम है, inherited है, company के नाम है या Power of Attorney के माध्यम से transaction हो रहा है, तो documentation अलग हो सकती है। ऐसे cases में qualified property lawyer से documents review कराना बेहतर है।
2. Sale Deed और Ownership Chain Check करें
Current ownership document के साथ previous ownership records भी examine कराएं ताकि यह समझा जा सके कि property समय के साथ किस प्रकार transfer हुई है।
सिर्फ photocopy या broker द्वारा दिखाई गई document image पर निर्भर न रहें। Relevant original/official records की verification transaction के अनुसार कराएं।
3. Property पर Loan, Charge या Dispute तो नहीं?
Buyer को यह पता करना चाहिए कि property किसी existing home loan, mortgage, financial charge, litigation या अन्य encumbrance से प्रभावित तो नहीं है।
अगर seller ने property पर loan लिया हुआ है, तो transaction structure और lender-related closure/documentation को payment से पहले properly understand करें।
4. Sanctioned Building Plan Check करें
विशेष रूप से builder floor या independently constructed property खरीदते समय actual construction को sanctioned building plan से compare करना महत्वपूर्ण हो सकता है।
अतिरिक्त room, enclosed balcony, extra floor या अन्य alteration देखकर यह assume न करें कि construction automatically approved है।
For Delhi properties, DDA provides official information relating to building-plan sanction and completion/occupancy processes. Use the official DDA Building FAQs as an authority link.
5. RERA Details Check करें — जहाँ Applicable हो
अगर आप under-construction या किसी real-estate project में property खरीद रहे हैं, तो check करें कि उस project पर RERA registration requirements लागू होती हैं या नहीं। Applicable होने पर project की registration details, promoter information और available disclosures संबंधित RERA portal पर verify करें।
हर individual resale property या builder floor को automatically RERA-registered होना जरूरी मानना सही नहीं है; applicability property/project के facts पर निर्भर कर सकती है।
For Delhi, link readers to the official Delhi RERA portal.
6. Completion / Occupancy Documents Check करें
Property type और applicable authority के अनुसार completion या occupancy-related documentation की आवश्यकता हो सकती है। Buyer को यह समझना चाहिए कि selected property पर कौन से documents applicable हैं और उनकी status क्या है।
केवल इस आधार पर legal compliance assume न करें कि property में पहले से लोग रह रहे हैं या electricity/water connection मौजूद है।
7. Property Tax, Electricity, Water और Maintenance Dues
Seller से latest available property tax, electricity, water और society/maintenance dues की जानकारी मांगें। Outstanding liabilities transaction complete होने से पहले identify करना बेहतर है।
Apartment या society property में association/society-related dues और applicable transfer requirements भी check करें।
8. Parking, Terrace और Common-Area Rights
Builder floor transactions में parking, terrace, staircase, lift और common-area rights को लेकर assumptions न बनाएं।
अगर seller कहता है “यह parking सिर्फ आपकी है” या “terrace rights आपके होंगे”, तो पूछें कि यह अधिकार relevant property documents में किस प्रकार recorded है।
Token देने से पहले क्या करें?
Token Money Rule: सिर्फ WhatsApp messages, broker assurance या verbal commitment के आधार पर बड़ी token amount न दें। Payment से पहले refund/forfeiture conditions, property details, seller details और agreed commercial terms को लिखित रूप में समझें। जहां आवश्यक हो, lawyer से transaction documents review कराएं।
CredEstate Legal Check: Online property portals property खोजने में मदद कर सकते हैं, लेकिन legal due diligence का replacement नहीं हैं। बड़ी financial commitment से पहले specific property के documents को qualified professional से independently verify कराना उचित है।
Step 8: Property की सही कीमत कैसे पता करें और Negotiation कैसे करें?
पहली बार घर खरीदते समय seller या broker द्वारा बताया गया asking price जरूरी नहीं कि property की final market value हो। सही price समझने के लिए उसी locality की comparable properties, property की condition, floor, age, parking, road location और usable space को साथ में evaluate करें।
सिर्फ यह देखकर कि “इस area में property ₹X प्रति sq.ft. चल रही है” decision लेना भी सही नहीं है। एक ही colony या sector में अलग-अलग block, road, building condition और property specifications के कारण कीमत में काफी अंतर हो सकता है।
1. Same Locality की Comparable Properties देखें
अपनी shortlisted property की तुलना कम से कम 3–5 similar properties से करें। कोशिश करें कि comparison जितना संभव हो उतना समान हो:
Same locality/block → Similar property type → Similar size → Similar age → Similar floor → Similar parking → Similar condition
उदाहरण के लिए, Greater Kailash के एक renovated builder floor की तुलना Dwarka के society apartment से करना meaningful price comparison नहीं होगा।
2. Asking Price और Actual Deal Price में फर्क समझें
Online portal पर दिखाई देने वाली कीमत आमतौर पर asking price होती है—यानि seller कितना मांग रहा है। यह जरूरी नहीं कि transaction उसी price पर complete हो।
इसलिए केवल online listings का average निकालकर उसे exact market value न मानें। Local comparables, recent transactions जहाँ reliable information उपलब्ध हो, और property-specific characteristics भी देखें।
3. ₹/sq.ft. Compare करने से पहले Area का Meaning समझें
यह बहुत महत्वपूर्ण है। Add:
दो properties दोनों “1,500 sq.ft.” advertised हो सकती हैं, लेकिन दोनों में buyer को मिलने वाला actual usable space समान होना जरूरी नहीं है।
Compare करने से पहले पूछें कि quoted area carpet area, built-up area, super built-up area या किसी अन्य measurement basis पर है।
इसलिए केवल:
Property Price ÷ Advertised Area
करके निकला ₹/sq.ft. figure हमेशा सही comparison नहीं देता।
4. इन Factors से Property Price बदल सकती है
| Factor | Price पर संभावित प्रभाव |
|---|---|
| Exact Block/Sector | एक locality के अंदर भी demand बदल सकती है |
| Road/Approach | Access और road characteristics महत्वपूर्ण हो सकते हैं |
| Floor | Buyer preference/property type के अनुसार |
| Lift | Multi-floor properties में महत्वपूर्ण |
| Parking | Dedicated/usable parking value प्रभावित कर सकती है |
| Property Age | Older property में repairs/renovation लग सकती है |
| Condition | Ready-to-move vs renovation requirement |
| Sunlight/Ventilation | End-user desirability प्रभावित कर सकती है |
| Legal Clarity | Documentation problems major risk हैं |
| Amenities | Apartments में society facilities महत्वपूर्ण |
| Metro/Connectivity | Demand को प्रभावित कर सकती है |
| Noise/Commercial Activity | Residential desirability बदल सकती है |
5. Renovation Cost को Price में जोड़ें
मान लीजिए Property A ₹70 लाख में है और Property B ₹75 लाख में।
पहली नजर में Property A सस्ती दिखाई देती है। लेकिन अगर Property A में ₹8 लाख का renovation चाहिए और Property B move-in ready है, तो comparison बदल जाता है।
Property A
₹70 lakh purchase price
- ₹8 lakh estimated repairs/interiors
= ₹78 lakh before other transaction costs
Property B
₹75 lakh purchase price
- ₹1 lakh minor work
= ₹76 lakh before other transaction costs
इसलिए negotiation केवल seller के asking price पर नहीं, बल्कि property की total acquisition + improvement cost को ध्यान में रखकर करें।
Property Price Negotiate कैसे करें?
Negotiation की शुरुआत random low offer से करने के बजाय evidence से करें। अगर आपने comparable properties देखी हैं, renovation estimate लिया है और property की limitations समझी हैं, तो आपके पास negotiation का logical आधार होगा।
Negotiation से पहले ये 5 Numbers लिख लें
1. Asking Price — Seller कितना मांग रहा है
2. Comparable Price Range — Similar properties कितने में available हैं
3. Additional Cost — Repairs/interiors आदि
4. Your Target Price — आप ideally कितना देना चाहते हैं
5. Maximum Walk-Away Price — इससे ऊपर आप deal नहीं करेंगे
The fifth one is especially important.
पहली बार buyers emotional होकर अपना budget बार-बार बढ़ाते हैं। Property visit से पहले अपना maximum walk-away price तय करना आपको financially unsuitable deal से बचा सकता है।
Seller से ये Questions पूछें
- Property कब से sale पर है?
- Seller बेच क्यों रहा है?
- Price negotiable है?
- Parking included है?
- Fixtures/fittings क्या-क्या included हैं?
- कोई outstanding dues हैं?
- Property पर existing loan है?
- Possession कब मिलेगा?
- कोई brokerage applicable है?
- Final quoted amount में क्या-क्या included नहीं है?
सिर्फ Discount देखकर Deal Final न करें
अगर ₹80 लाख की property seller ₹74 लाख में देने को तैयार है, तो इसका मतलब automatically यह नहीं है कि आपको ₹6 लाख का फायदा हुआ।
असली सवाल है:
क्या property वास्तव में ₹74 लाख के आसपास value करती है?
Artificially high asking price पर मिला बड़ा discount भी खराब deal हो सकता है।
CredEstate Negotiation Rule
Property को asking price से नहीं, comparable value से judge करें। Seller कितना discount दे रहा है उससे ज्यादा महत्वपूर्ण है कि final price property की location, condition, legal status और comparable market options के हिसाब से reasonable है या नहीं।
Step 9: Token Money या Booking Amount देने से पहले क्या Check करें?
Property पसंद आने के बाद seller या broker अक्सर deal “block” करने के लिए token money या booking amount मांग सकता है। पहली बार buyer को इस stage पर जल्दबाजी नहीं करनी चाहिए। Payment करने से पहले यह स्पष्ट होना चाहिए कि पैसा किस property के लिए, किस व्यक्ति को, किन conditions पर और refundable या non-refundable किस स्थिति में दिया जा रहा है।
Token देना property की legal verification का substitute नहीं है। बड़ी amount transfer करने से पहले transaction की terms और available property documents को समझें और जरूरत पड़ने पर qualified property lawyer से review कराएं।
Token देने से पहले ये 10 चीजें Check करें
| Check | क्या Confirm करें |
|---|---|
| 1. Seller Identity | Payment लेने वाला व्यक्ति और property owner/authorised party कौन है |
| 2. Property Details | Exact address, floor/unit, area और property identification |
| 3. Final Agreed Price | Total consideration कितना तय हुआ |
| 4. Token Amount | अभी कितना payment किया जा रहा है |
| 5. Balance Payment | बाकी payment कब और कैसे होगा |
| 6. Legal Verification | Documents में problem मिलने पर क्या होगा |
| 7. Home Loan Condition | Loan sanction/approval fail होने की स्थिति क्या होगी |
| 8. Refund Terms | Token किन परिस्थितियों में refundable है |
| 9. Forfeiture Terms | Buyer पीछे हटे तो क्या amount forfeited होगी |
| 10. Possession Timeline | Property/keys कब hand over होंगे |
Written Receipt जरूर लें
Token payment के लिए proper written acknowledgement/receipt रखें। इसमें कम से कम buyer और seller details, property identification, amount, payment date और agreed purpose स्पष्ट होना चाहिए।
केवल broker के WhatsApp message या verbal statement को transaction की पूरी documentation न मानें।
“Refundable Token” सुनकर Assume न करें
अगर broker या seller कहता है कि “token पूरी तरह refundable है”, तो पूछें—किन conditions में?
उदाहरण के लिए, पहले स्पष्ट करें कि क्या होगा अगर:
- Legal verification में serious problem निकलती है
- Seller transaction complete नहीं करता
- Home loan selected property पर approve नहीं होता
- Agreed documents उपलब्ध नहीं होते
- Buyer निर्धारित समय में balance payment नहीं करता
इन situations की treatment लिखित terms में समझना verbal assurance से बेहतर है।
बड़ी Cash Payment से बचें
Property transaction से जुड़े payments के लिए traceable banking channels और proper documentation रखना बेहतर है। बड़ी cash transactions पर tax-law restrictions भी लागू हो सकती हैं, इसलिए applicable rules के लिए tax/legal professional से advice लें।
Original Documents कब मिलेंगे?
अगर resale property है, तो seller से पूछें कि original title/property documents कहाँ हैं। अगर property पर existing home loan है और originals lender के पास हैं, तो loan closure और document-release process पहले समझें।
Token देने से पहले यह Sequence Follow करें
Property Shortlist
↓
Price Negotiate
↓
Seller + Basic Documents Verify
↓
Token Terms लिखित में तय करें
↓
Payment + Receipt
↓
Detailed Legal/Technical Verification
↓
Agreement / Loan / Registration Process
CredEstate Token Rule: “आज token नहीं दिया तो property निकल जाएगी” जैसी urgency के कारण legal या financial checks skip न करें। गलत property पर जल्दी payment करने से बेहतर है अच्छी deal छोड़ देना।
Step 10: Home Loan Apply करने की पूरी प्रक्रिया
Property shortlist होने के बाद home loan process में borrower की financial eligibility के साथ selected property की documentation भी महत्वपूर्ण होती है। इसलिए loan eligibility और property approval को एक ही चीज न समझें।
अलग-अलग banks और housing-finance companies की documentation, interest rate, processing charges, eligibility और approval criteria अलग हो सकते हैं। केवल सबसे कम advertised interest rate देखकर lender select न करें।
Home Loan Process आमतौर पर कैसे आगे बढ़ती है?
Application → Income/Credit Assessment → Document Verification → Property Legal/Technical Check → Sanction → Loan Documentation → Disbursement
कौन से Documents मांगे जा सकते हैं?
Borrower profile के अनुसार lender commonly मांग सकता है:
- PAN और identity/address documents
- Salary slips या business-income documents
- Bank statements
- Income-tax related documents जहाँ applicable हों
- Existing loan/EMI details
- Property documents
- Agreement/transaction documents
- Down-payment contribution evidence जहाँ required हो
Exact requirements lender और borrower profile के अनुसार बदल सकती हैं।
सिर्फ Interest Rate Compare मत करें
| Loan Factor | क्या Compare करें |
|---|---|
| Interest Rate | Floating/fixed structure और applicable rate |
| Processing Fee | Actual payable amount |
| Loan Tenure | EMI और total interest दोनों |
| Prepayment Rules | Applicable conditions |
| Other Charges | Legal/technical/documentation-related charges |
| Rate Reset | Floating rate कैसे change हो सकती है |
| Customer Service | Future servicing कितनी आसान है |
| Disbursement Terms | Seller/developer को पैसा कब release होगा |
EMI कम होना हमेशा सस्ता Loan नहीं होता
Longer tenure से monthly EMI कम हो सकती है, लेकिन borrower लंबे समय तक interest pay कर सकता है। इसलिए सिर्फ “सबसे कम EMI” देखकर loan choose करने के बजाय total repayment impact भी समझें।
Step 11: Agreement, Stamp Duty और Property Registration कैसे होती है?
Property की legal verification, price negotiation और financing complete होने के बाद transaction agreement और registration stage में पहुंचता है। पहली बार buyer के लिए यह समझना जरूरी है कि property price ही final cost नहीं होती—stamp duty/transfer duty और registration fee भी budget का हिस्सा हैं।
Delhi में property registration Registration Act, 1908 के framework के तहत संबंधित Sub-Registrar office में की जाती है।
Agreement Sign करने से पहले क्या Check करें?
Agreement या transaction document को सिर्फ price देखकर sign न करें। उसमें property और transaction की important conditions clearly understand करें।
Check:
- Buyer और seller का सही नाम
- Property का exact description/address
- Final agreed consideration
- पहले दिया गया token/advance
- Balance payment schedule
- Possession date
- Fixtures/fittings included हैं या नहीं
- Existing loan/dues की treatment
- Default/cancellation conditions
- Applicable refund/forfeiture conditions
- Original documents handover
- Parking/other rights जहाँ relevant हों
किसी clause का meaning clear न हो तो sign करने से पहले qualified property lawyer से document review कराएं।
Delhi में Stamp Duty कितनी है?
Current Delhi Revenue Department information के अनुसार, Sale Deed के लिए stamp duty/transfer duty presently:
| Buyer | Current Rate |
|---|---|
| Male | 6% |
| Female | 4% |
Registration Fee कितनी है?
Delhi Revenue Department currently states:
Registration Fee = 1% of consideration amount or applicable circle-rate value, whichever is higher + ₹100 pasting fee.
Example: ₹50 लाख की Property
एक simplified illustration दे सकते हैं:
अगर applicable registration valuation ₹50 lakh है:
Male buyer
Stamp/transfer duty at 6% = ₹3,00,000
Registration fee at 1% = ₹50,000
Pasting fee = ₹100
Approx. total of these charges = ₹3,50,100
Female buyer
Stamp/transfer duty at 4% = ₹2,00,000
Registration fee at 1% = ₹50,000
Pasting fee = ₹100
Approx. total = ₹2,50,100
Note: यह केवल ₹50 लाख applicable valuation पर simplified example है। Actual charges property valuation, ownership structure, deed type और उस समय लागू government rules पर निर्भर कर सकते हैं। Payment से पहले Delhi Revenue Department के current rates verify करें।
Circle Rate को Ignore क्यों नहीं करना चाहिए?
Buyer और seller के बीच agreed property price ही registration calculation का एकमात्र relevant number नहीं हो सकता। Delhi Revenue Department के अनुसार applicable stamp duty और registration fee calculations में consideration amount और applicable circle-rate value में जो अधिक हो वह relevant हो सकता है.
इसलिए negotiation के दौरान ही applicable circle-rate valuation समझ लें, न कि registration के दिन पहली बार।
Step 12: Possession लेते समय क्या Check करें?
Registration और final payment के बाद भी home-buying process पूरी तरह खत्म नहीं होती। Possession लेते समय property की physical condition, promised fixtures, utilities, keys, parking और applicable handover documents को carefully verify करना जरूरी है।
अगर property नई या recently constructed है, तो possession लेने से पहले defects की एक written list बनाना useful हो सकता है। Resale property में भी यह confirm करें कि property agreed condition में खाली और handover के लिए ready है।
Possession से पहले 15-Point Checklist
| # | क्या Check करें | क्या Verify करें |
|---|---|---|
| 1 | Property Condition | वही property और agreed condition |
| 2 | Walls & Ceiling | Cracks, dampness, seepage |
| 3 | Doors & Windows | Locks, handles, glass और operation |
| 4 | Plumbing | Taps, flush, drainage और leakage |
| 5 | Electricity | Switches, sockets, meter और supply |
| 6 | Water Supply | Pressure, storage और connection |
| 7 | Fixtures | Agreement में included fixtures मौजूद हैं |
| 8 | Lift | Working condition जहाँ applicable |
| 9 | Parking | Agreed/allotted parking identify करें |
| 10 | Keys | Main door + other applicable keys/remotes |
| 11 | Meter Readings | Electricity/water readings record करें |
| 12 | Outstanding Dues | Applicable maintenance/utilities आदि |
| 13 | Documents | Agreed originals/copies प्राप्त करें |
| 14 | Common Areas | Access और applicable facilities |
| 15 | Possession Record | Handover/possession acknowledgement रखें |
Snag List बनाएं
Possession से पहले property को room-by-room inspect करें और जो भी defect मिले उसकी photo/video के साथ snag list बनाएं।
उदाहरण:
Master Bedroom → Window lock damagedKitchen → Sink leakageBathroom 1 → Exhaust not workingBalcony → Drainage issueNew property में developer/seller से applicable defects को rectify कराने की process लिखित रूप में समझें।
Meter Reading की Photo लें
Electricity और water meter की possession-day reading की clear photo रखना useful है। इससे handover से पहले और बाद की consumption को distinguish करने में मदद मिल सकती है।
Seller से सभी Keys लें
सिर्फ main-door keys नहीं। Applicable होने पर check करें:
Main entrance • Bedrooms • Balcony • Terrace/access • Mailbox • Parking/access gate • Remote controls
अगर digital lock है, तो previous access codes reset/change करें।
Fixtures की List Match करें
अगर deal में AC, geyser, wardrobes, lights, fans, modular kitchen appliances या अन्य fixtures included थे, तो possession से पहले agreed list से match करें।
Verbal promise पर depend करने के बजाय transaction documentation में included items स्पष्ट होना बेहतर है।
Outstanding Dues फिर से Verify करें
Check:
- Electricity dues
- Water dues
- Property-related dues
- Society/maintenance dues
- Applicable parking charges
- Other agreed outstanding liabilities
Apartment/society property में applicable maintenance/no-dues/transfer documentation भी collect करें।
Documents की Handover Checklist बनाएं
Transaction के अनुसार applicable documents अलग होंगे, लेकिन buyer को अपने property file में relevant records व्यवस्थित रखने चाहिए:
Registered transaction document + previous agreed property documents + payment proofs + loan documents + possession/handover records + utility/society documents
इनकी physical और cloud backup दोनों रखना अच्छा practice है।
Property खाली है या नहीं Verify करें
Resale property में possession लेने से पहले confirm करें कि seller/previous occupant ने property agreed terms के अनुसार vacate कर दी है और कोई सामान या access issue बाकी नहीं है।
Possession के तुरंत बाद
Practical security steps भी add करें:
Resale property मिलने के बाद main-door locks/changeable access credentials बदलने पर विचार करें। Society/security management को ownership/occupancy change की information दें जहाँ applicable हो और utility/society records update कराने की applicable process शुरू करें।
CredEstate Possession Rule
Keys मिलना ही complete possession नहीं है। Property condition, meter readings, dues, documents, parking, fixtures और actual handover को verify करके possession record रखें।




Join The Discussion